What, How & Why? – Pipe Lining
Home /
What, How & Why? – Pipe Lining

Pipe lining is a great way to rehabilitate your sewer lines. My company does all the methods that we will be discussing in this series so I’m not just recommending one over the other due to lack of experience or knowledge of it.
I’m starting with lining because in my humble opinion it is the best way rehabilitate most sewer lines. It is by no means the only way but it most circumstances it tends to be the most effective. Whether its roots, cracks, persistent scale build up or even a gapping hole in your sewer. Lining is your answer to solving these issues once and for all. For a brief breakdown of the other methods of sewer pipe rehabilitation please visit our “Why Trenchless Sewer Line Rehabilitation” post here. For now let’s dive into Pipe Lining a little more.
What is Pipe Lining?
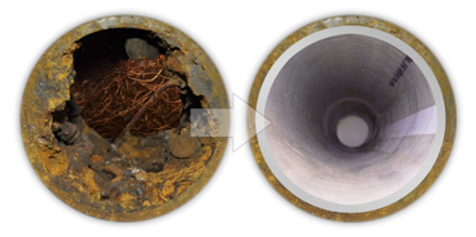
Pipe Lining is a method of sewer pipe rehabilitation. What does that mean? Your pipes over time develop scale, cracks or breaks. All these catch debris and create clogs. Pipe lining addresses all these and will give you a lasting solution, by inserting an epoxy saturated sleeve into your sewer line and blown up to the diameter of the pipe. Once it has time to cure then voilà, you basically have a new pipe inside of your old pipe. Want to know a little more as to what’s involved? Let’s get into it.
Step 1 – Video Inspection
What’s going on in your pipes? Do you have breaks? Scale? Foreign Object? In order to find out what’s going on a video inspection of your sewer line a video inspection needs to be performed. This is going to tell your plumber exactly what needs to be done to rehabilitate your sewer line. It’ll help him decide which method should be used, the strategy in which to carry out said method as well as the cost to you. If someone says they can give you a firm price without performing a video inspection, RUN!!! It’s just not possible, there are too many variables that need to be taken into account. Where does the pipe run? What condition is the pipe in? How much scale is in the pipe and what is it going to take to remove it? Any obstructions that need to be removed? How many lateral tie ins (We’ll get into that in a bit)? A video inspection must be performed for an accurate estimate to be provided.
Limited Excavation
This process requires direct access to the line being rehabilitated. This can be done at times through a clean out outside your home. However, most of the time it will require excavating a hole where the pipe that is going to be rehabilitated can be opened and the remaining process can be performed. When this is a main trunk line to a house or business it can most likely be done outside the foundation in the yard. Since it technically isn’t always necessary we aren’t going to include it as an actual step but we wanted to make sure you knew that there may be at least a bit of excavation involved.
Step 2 – Descale and Cleaning
Unless your house was built in the 80s or sooner then you most likely have cast iron pipes under your home. Cast iron rusts and thins which can cause cracks or breaks. Cast iron pipe also goes through what called Tuberculation. This is the deposits from the iron in water to the sides of the pipe. We call it scale build up. This build up causes debris to catch and clog as well.
You don’t want to just put your “Liner” over this scale build up. Sure it’ll be smooth but it’ll be like a roller coaster ride for the debris, creating pockets of water or restrictions in the pipe that slows down the debris and can still cause clogs. So this scale need to be removed to allow the Liner to adhere to the pipe with the smoothest surface possible and with the greatest diameter. A high RPM rotary machine is used to remove the scale from the sides of the pipe. Then that scale is flushed out of your pipe using high pressure water leaving as smooth and wide a pipe as possible.
Step 3 – The Lining Process
After the line is cleaned comes the fun stuff. A 2 part resin is mixed together (think JB Weld but not as thick) and put into a sleeve. The inside of the sleeve is a felt like material and the outside is a PVC coating. Once all the “felt” has been saturated the liner is wound up in a machine that will use air to turn it inside out into your pipe. So the felt with the resin is now on the outside laying in your pipe. A balloon (known as a calibration tube) is blown up inside the liner so it adheres to the newly cleaned sides of your pipe. After it’s cured you have a new pipe inside your old pipe.
Step 4 – Reinstatements
When this process is used on the main trunk line of your sewer all the tie ins (This is where your restrooms or kitchen dump into your mainline) are now covered. They have to be reopened or reinstated. This is done one of two ways, 1) A robotic arm with a drill is placed in your mainline which cuts out the tie in or 2) A drill is placed in the line that is dumping into the mainline and is cut out. This is called a backside cut. Once the cuts are made your main sewer line is now rehabilitated and can be put back into service.
Why Pipe Lining?
This new liner that is now installed in your sewer not only has a slick surface for the debris to go through but it provides structural support for your pipes. Any cracks or breaks have been covered and will no longer snag debris. Since the liner is essentially a PVC sleeve it will not form scale like your cast iron pipe did. While this process may require a small hole to be excavated, it is far better then trenching through your living room or across your precious garden.
While this process can seem like a lot it can typically be completed in just a few days. If you are experiencing constant clogging ask your plumber for a video inspection of your sewer lines. Then explore your rehabilitation options to see which would best suit your needs. Look for our post next week where we’ll discuss the Pull-in-Place method of pipe line rehabilitation.
Your Friendly Neighborhood Plumber,
Bryan Lopez
Bio Remedies

